Overview Tab
The Overview tab is typically your starting point if you want to navigate the model quickly, access additional information like the data trail analysis or general configuration like AI Tokens for your account.
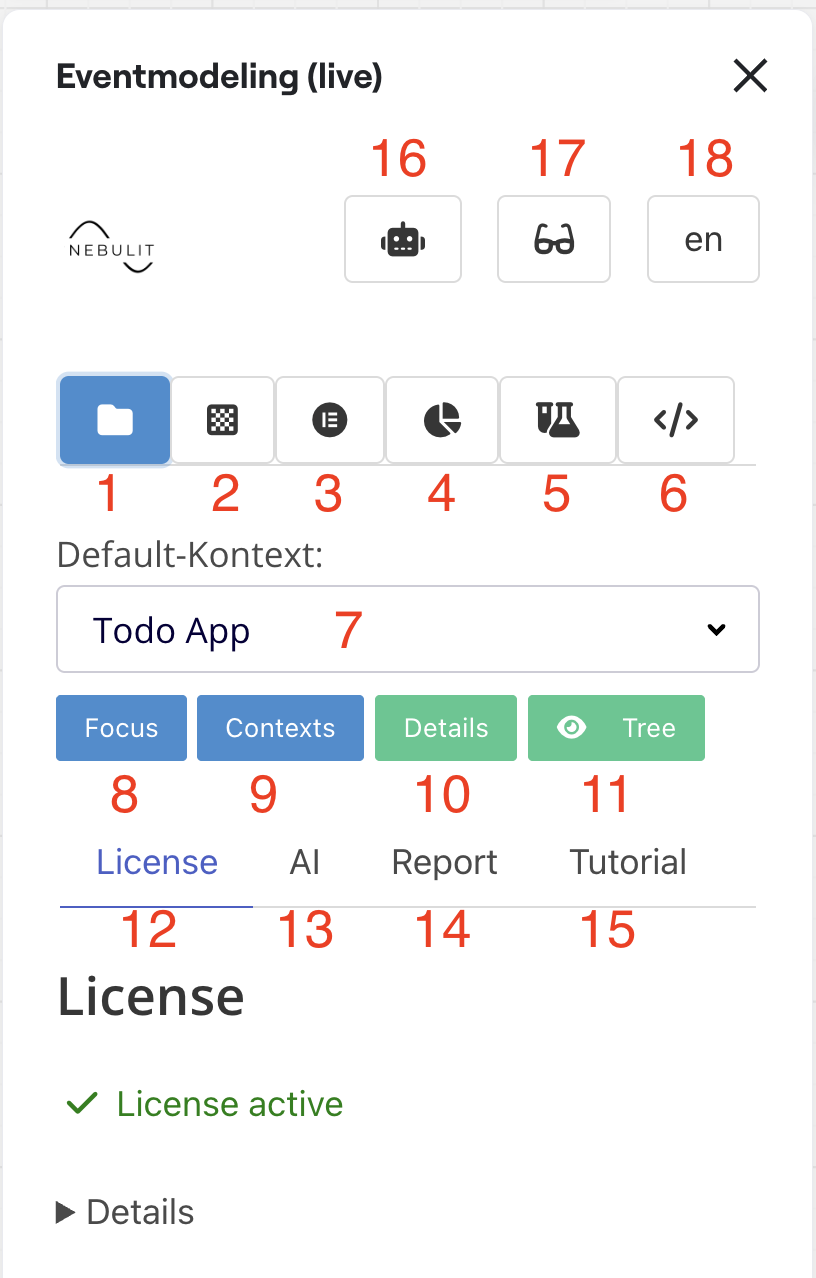
Activating Your License
To activate your license, send an email to info@nebulit.de with your Miro Account (17). If you bought a License, it will get activated within just a few hours.
Interface Elements
Main Navigation Tabs
1) Overview Tab (Current)
- View all contexts and easily navigate between them
- Access to the Tree View
- License Management (13)
- AI Token and Model Configuration (14)
- Details about your account (17)
2) Model Tab
- Quickly access all elements and place them on the board
- Your starting point for most modeling tasks
3) Element Tab
- Look at the details of any Element
- Change fields and properties
4) Slice Tab
- Access one-click modeling
- Use Slice features for rapid development
5) Scenario Editor
- Edit GWT (Given-When-Then) scenarios
- Define behavior-driven specifications
6) Code Tab
- Everything around Code Generation
- LLM integration for code assistance
Context Navigation
7, 8) Context Switcher
- Quickly navigate between all contexts on your board
- Jump to different bounded contexts
9) Context Overview
- Opens a dynamically generated map of all Models/Contexts on the board
- Visual representation of your entire model structure
Model Details and Tools
10) Model Details
- Additional Information like Data Trails
- Legacy Systems integration
- View Details
11) Tree View
- Opens a hierarchical tree view of the whole model
- Navigate complex models easily
12) License Management
- Manage your Licenses
- View license status and features
13) AI Configuration
- Configure your AI Token
- Set up Model Configuration
- Configure AI
14) Report
- Quick overview of your model
- Better to use the slice-forecasting for detailed analysis
15) Tutorial
- Quick access to resources
- Get started guides
Additional Features
16) AI View
- Enable “Chat with your model” feature
- Takes your existing Event Model and parses it
- Makes model available for Chat Session
- Speak to your Requirements naturally
- Learn more about AI Chat
17) Annotations (Glasses Icon)
- Enable annotations within the plugin
- Provides useful hints while you work
- Fastest way to learn the tooling
18) Language Switcher
- Switch between German and English
- Spanish support coming soon
Quick Start Workflow
- Start in Overview Tab - Get oriented with your model
- Navigate to Model Tab - Access and place elements
- Use Element Tab - Configure specific elements
- Try AI View - Chat with your model for insights
- Enable Annotations - Get contextual help as you work
Next Steps
- Configure AI Settings - Set up your AI tokens
- Use AI Chat - Chat with your model
- View Contexts - Navigate hierarchical contexts
- Explore Data Trails - Trace data flow