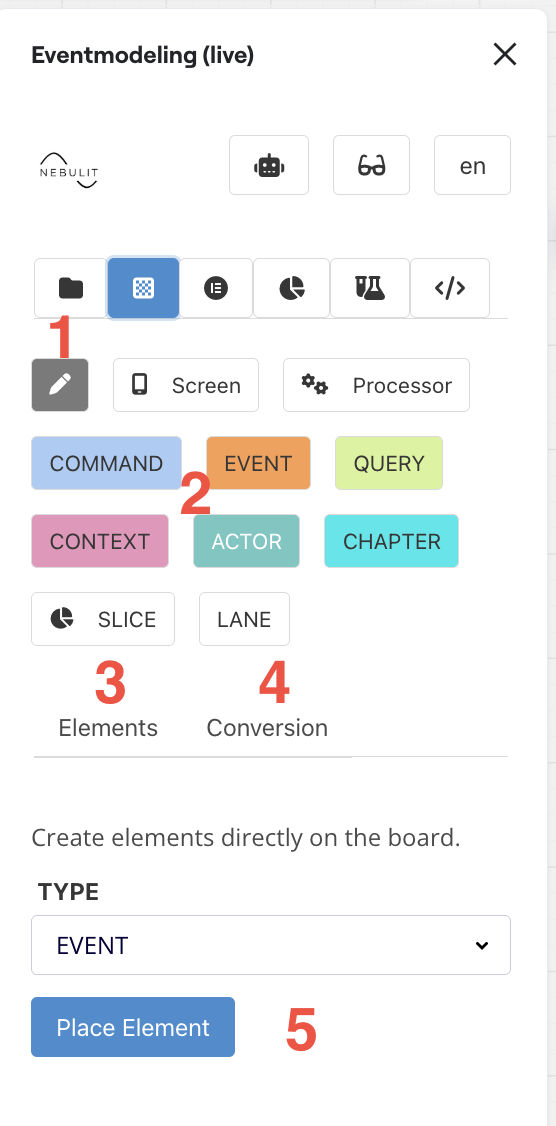
Elements View
Use this View to place new Elements on your canvas, either by clicking them, dragging them onto the Canvas, or by selecting an element and placing it directly on the board.
Interface Elements
1) Screen Drawer
Use this to draw a new screen mockup directly on your canvas. This provides a quick way to visualize user interfaces as part of your event model.
2) Place Elements by Clicking or Dragging
Browse and select from all available element types. You can either:
- Click an element to enter placement mode, then click on the canvas to place it
- Drag an element directly from the list onto your canvas
3) Enable Multi Elements
Click here to enable multi element placement mode. This feature allows you to place several elements efficiently by simply writing them out. Perfect for quickly building out your model structure.
4) Conversion Tool
Use this to convert plain Miro Sticky Notes into Event Model Elements. This is useful when you’ve been brainstorming with standard sticky notes and want to formalize them into your event model.
5) Element Selection Panel
Here you can see and select all available element types to place on your canvas. The panel shows the complete catalog of elements you can use in your event modeling.
AI View for Elements
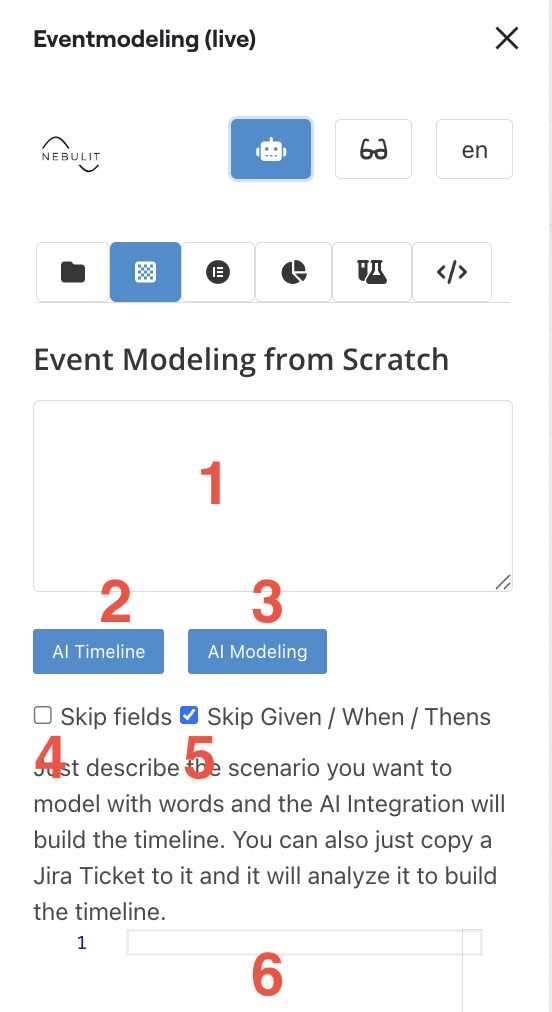
The AI View provides powerful capabilities to generate event model elements using natural language prompts.
1) AI Prompt
Enter your natural language description of the use case or timeline you want to model. The AI will interpret your prompt and generate appropriate event model elements.
2) Build Timeline from Prompt
Click this to generate an ordered list of Events from your prompt. The AI will analyze your description and create a chronological sequence of events.
3) Model Entire Use Case
Use the prompt to model a complete use case in one go. This generates all necessary elements including commands, events, and read models based on your description.
4) Skip Fields Option
Enable this if you want the AI to generate only the element names without detailed field definitions. Useful for rapid prototyping or high-level modeling.
5) Skip Given/When/Then
Focus solely on the elements without generating Given/When/Then scenarios. This keeps the output clean when you only need the structural elements.
6) Resulting JSON
View the generated JSON that represents your model elements. This JSON can be directly applied to your canvas to create the elements.
Supported Element Types
The Miro Event Modeling Toolkit supports a comprehensive set of element types for modeling your domain:
Core Event Modeling Elements
MODEL_CONTEXT
- A name for one model on the board
- Allows for easy navigation between different bounded contexts
CHAPTER
- A grouping of Events
- Helps organize your timeline into logical sections
SLICE
- A border you can drag around elements to “slice” them together
- Represents a complete vertical slice of functionality
ACTOR
- Represents an actor in the system
- Could be a user, external system, or automated process
AGGREGATE
- Aggregates are placed in swimlanes
- Represents the consistency boundary in your domain
COMMAND
- Places a command element
- Represents an intention to change state
EVENT
- Places an event element
- Represents something that has happened in the system
READMODEL
- Places a read model
- Represents a view or projection of your data
Additional Elements
SCREEN
- Places a screen icon
- Represents user interface elements
AUTOMATION
- Places a “gear” symbol for an automation
- Represents automated processes or jobs
API
- Allows defining an additional API element
- Not part of traditional Event Modeling, but sometimes useful
EXTERNAL_DATA
- Can be used to provide external information
- Represents data from external systems
TABLE
- Places a table element
- Gets into the details of how data maps to legacy system tables
- Not part of traditional Event Modeling
Scenario Elements
SCENARIO
- Creates a new scenario
- Used for behavior-driven specifications
SPEC_COMMAND
- Places a command specifically for a scenario
- Used in Given-When-Then specifications
SPEC_EVENT
- Places an event for a scenario
- Represents expected outcomes in specifications
SPEC_ERROR
- Places an error case for a scenario
- Models exception paths and error handling
SPEC_READMODEL
- Places a read model for a scenario
- Shows expected view state in specifications
SPEC_COMMENT
- Places a comment for a scenario
- Adds documentation or notes to specifications
Organizational Elements
LANE
- Places a lane
- Creates swimlanes for organizing aggregates
SLICE_BORDER
- Places a new slice border
- Defines boundaries for vertical slices
SLICE_GROUP
- Places a slice group
- Creates a grouping of related slices
Tips for Using Elements
Quick Placement
- Use keyboard shortcuts after selecting an element
- Double-click to rapid-fire place multiple instances
- Use multi-element mode for bulk operations
AI-Assisted Modeling
- Start with a natural language description
- Let AI generate the initial structure
- Refine and adjust as needed
Organization Best Practices
- Use contexts to separate bounded contexts
- Group related elements with chapters
- Create slices for end-to-end features
- Place aggregates in lanes for clarity